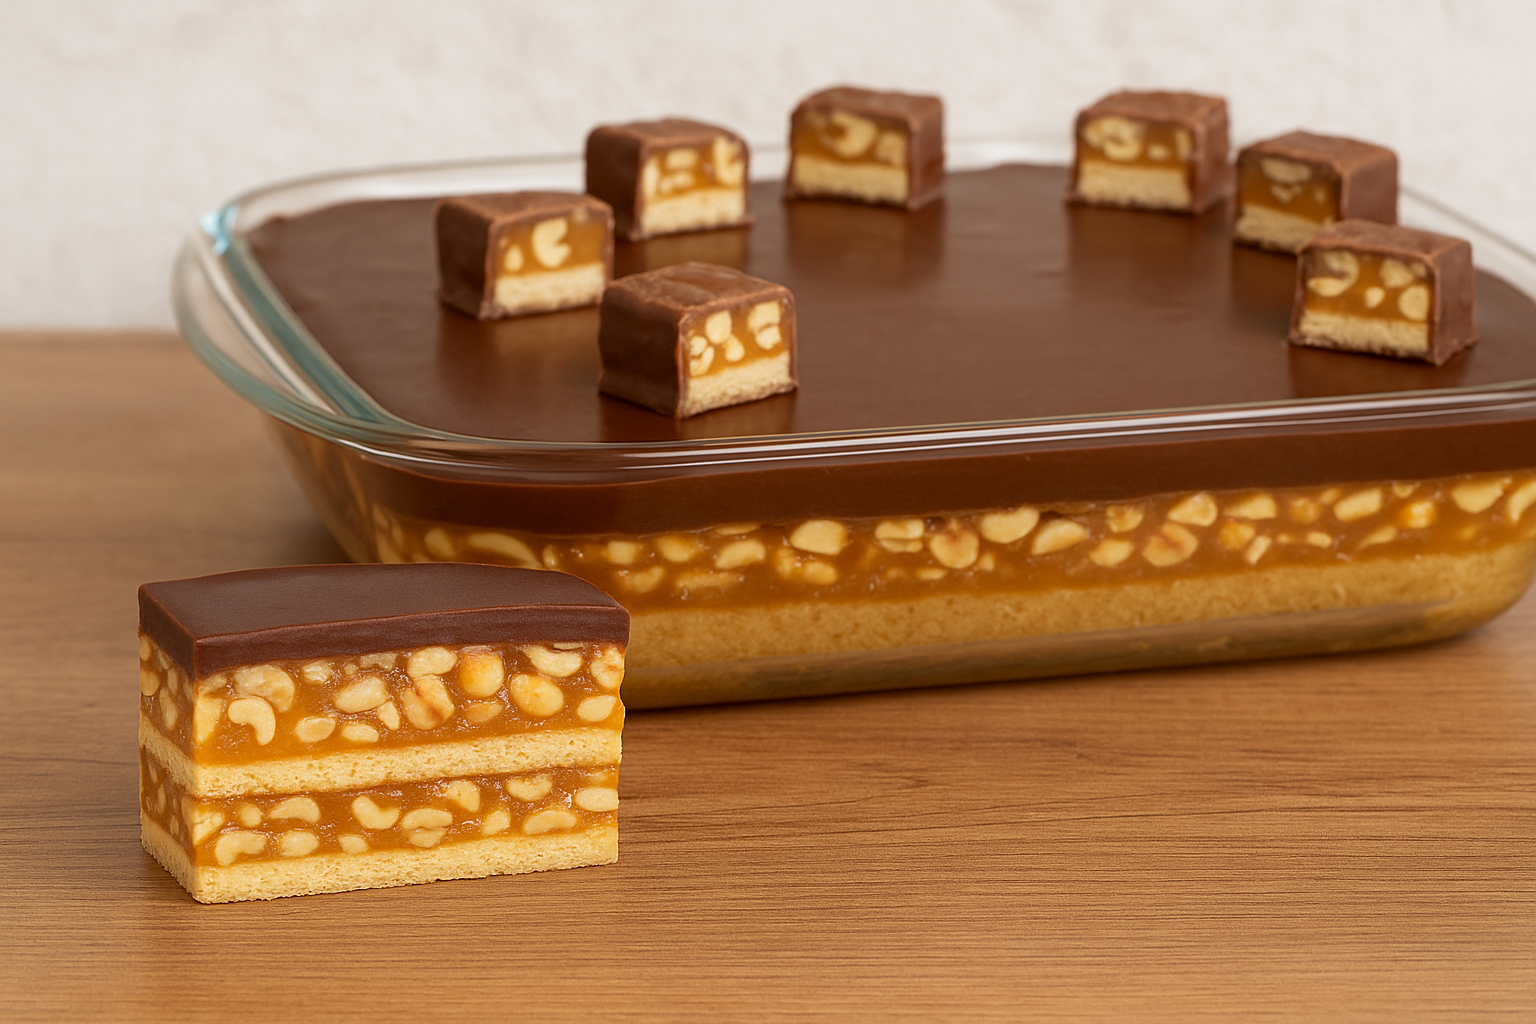
If you love the rich combination of peanuts, caramel, and chocolate, this Snickers Dessert Tray will become your new go-to treat. Inspired by the classic Snickers candy bar, this layered, no-bake dessert is perfect for parties, celebrations, or when you’re simply craving something decadent and homemade. Best of all, you don’t even need to turn on the oven!
I first came across this delicious idea after watching a YouTube video that instantly made my mouth water. Growing up in Brazil, layered desserts served in a tray (“na travessa”) were a family favorite — creamy, sweet, and always shared around the table. When I moved to the United States, I started experimenting with nostalgic flavors using ingredients I could easily find here. This dessert combines that comforting homemade feeling with the flavor of one of the world’s most loved candy bars.
Let’s walk through the layers of this treat and how you can make it step-by-step.
Ingredients You’ll Need
Here’s everything you’ll need to prepare this incredible Snickers Dessert Tray. My measuring cup holds 240ml.
For the Base:
- 200g of plain tea biscuits (similar to “Maria” or “Maizena” cookies)
- 500g of unsalted, roasted, skinless peanuts (finely crushed)
- 1 can of sweetened condensed milk (395g)

For the Filling:
- ½ cup of white sugar
- ½ can of sweetened condensed milk (197.5g)
- 1 small box of heavy cream (200g)
- 2 tablespoons of unsalted butter
- ½ cup of unsalted, roasted, skinless peanuts (whole or chopped)
For the Topping:
- 200g of semi-sweet (dark) chocolate
- 1 small box of heavy cream (200g)
- Chopped Snickers bars (as much as you like for decoration)
Step-by-Step Instructions for the Snickers Dessert
1. Making the Crunchy Peanut Base
Start by preparing your tray base, which offers a firm, nutty crunch that mimics the texture of a candy bar bottom.
- Crush the biscuits using a food processor or by placing them in a zip-top bag and smashing them with a rolling pin.
- In a large bowl, combine the crushed biscuits, the 500g of crushed peanuts, and 1 full can of sweetened condensed milk.
- Mix until everything is well incorporated. It should look like a slightly sticky dough.
- Spread this mixture into a rectangular or square serving tray. Press firmly with the back of a spoon or spatula until evenly compacted.
- Place the tray in the refrigerator while preparing the filling.
2. Preparing the Caramel-Peanut Filling
Now it’s time for that gooey, golden layer that makes this dessert truly addictive.
- In a heavy-bottom saucepan, add ½ cup of sugar and heat over medium-low until it melts and turns into a light golden caramel.
- Carefully add ½ can of condensed milk, 1 box of heavy cream, and 2 tablespoons of unsalted butter.
- Stir continuously until the mixture thickens into a creamy caramel. This usually takes about 8–10 minutes.
- Add ½ cup of peanuts and mix until evenly distributed.
- Pour the caramel layer over the chilled biscuit-peanut base and spread evenly.
- Place the tray back in the fridge to cool while you make the final chocolate layer.
Note: Keep stirring to avoid burning the caramel. Don’t walk away during this step!
3. Chocolate Ganache Topping
This luxurious layer adds a silky finish and completes the Snickers-inspired experience.
- Melt 200g of semi-sweet chocolate in a microwave-safe bowl or using a double boiler.
- Add 1 box of heavy cream (200g) to the melted chocolate and stir until smooth.
- Pour the ganache over the caramel-peanut layer and spread evenly with a spatula.
- While still soft, decorate with chopped Snickers bars for extra crunch and visual appeal.
- Refrigerate for at least 3 hours, or until fully set.
Serving Suggestions
Once the dessert is fully chilled and firm, slice it into squares or rectangles using a sharp knife. It’s rich, so smaller portions are usually enough to satisfy a sweet tooth. Serve it cold for best texture.
Optional: Sprinkle crushed peanuts on top of the chocolate before serving for an even tastier version.
Storage and Make-Ahead Tips
- Fridge: Store covered in the refrigerator for up to 5 days.
- Freezer: You can freeze it for up to 1 month. Wrap slices in parchment paper and place in an airtight container.
- Make Ahead: Ideal for preparing the day before a gathering, as the flavors meld and the texture improves after chilling overnight.
Why You’ll Love This Snickers Dessert Tray
This no-bake tray dessert is a crowd-pleaser for so many reasons:
- Simple ingredients: You likely already have most of them in your pantry.
- No oven needed: Great for summer or when you’re short on time.
- Customizable: Add extra caramel, switch the peanuts for cashews, or go heavier on chocolate.
- Visually stunning: That shiny ganache topped with Snickers chunks is a showstopper.
Personal Story: How I Fell in Love With This Recipe
After moving to the U.S., I often found myself missing Brazilian-style desserts — especially those made in a tray and shared at family gatherings. American sweets are delicious, but they often lack the creamy, layered, indulgent quality I loved so much.
One day, I stumbled upon a YouTube video showcasing a Brazilian dessert inspired by Snickers bars, and I knew I had to try it. After a few adjustments using American ingredients, it turned into a hit in my household.
My family now asks for this dessert every time there’s a celebration. It brings together the best of both worlds: the simplicity of Brazilian tray desserts and the iconic flavor of Snickers.
FAQs About the Snickers Dessert Tray
Can I use another type of nut?
Yes, you can use almonds, cashews, or even walnuts. However, peanuts bring the most authentic Snickers taste.
What can I use instead of tea biscuits?
You can substitute graham crackers or digestive biscuits. Just aim for a dry, crunchy cookie that will absorb the condensed milk and hold its shape.
Is this dessert gluten-free?
Not by default, as most tea biscuits contain gluten. But you can make it gluten-free by choosing certified gluten-free biscuits.
Final Thoughts
Whether you grew up eating layered desserts or just discovered them, this Snickers Dessert Tray is a recipe you’ll want to make again and again. It’s sweet, creamy, nutty, and chocolatey — all the things a dessert should be. And the best part? It’s incredibly easy to put together.
Next time you’re planning a get-together or just want a little comfort food at the end of a long week, try making this no-bake delight. You won’t regret it — and your guests will beg for the recipe.